The Hip Hostess

Menus, tips and ideas for hosting with style!

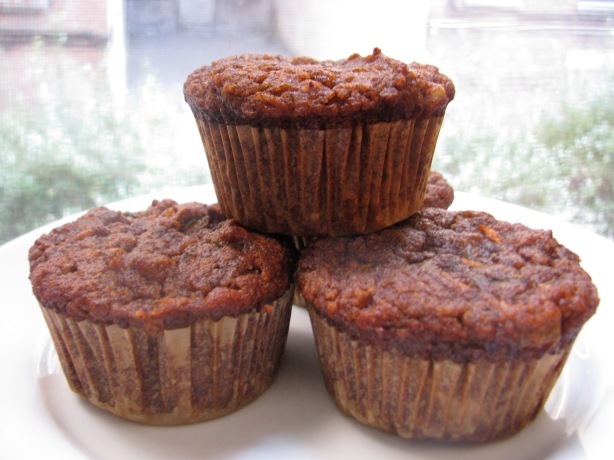
Gluten-Free Banana, Carrot & Date Muffins November 24, 2012

gluten-free whole-grain healthy quick breakfast recipe

These muffins are just what you need after several days of indulging.  They’re packed with fiber and contain no added sugar.  They’re also satisfying without causing a blood sugar spike or craving for additional sweets.  I found this recipe while searching on Pinterest for gluten-free muffins.  I have a few almond flour-based muffins that I make (including the Gluten-Free Blueberry Almond Muffins that are in the regular rotation), but was out of blueberries and looking for a new recipe to try.  A variation of this recipe was developed by Heidi Swanson over at 101 cookbooks (fruit-sweetened carrot cake), and was later made gluten-free by the skilled baker over at Elena’s Pantry.


These gluten-free muffins taste like a cross between a bran muffin and unfrosted carrot cake.  They’re very moist, slightly sweet and definitely taste whole-grain (which I like).  These muffins work well with a healthy brunch menu and any leftovers are a great on-the-go breakfast or snack.


Gluten-Free Banana, Carrot & Date Muffins


2 cup almond flour (such as Trader Jo’s almond meal)

2 teaspoons baking soda

1 teaspoon salt

1 tablespoon cinnamon

1 cup dates, pitted

3 medium ripe bananas

3 eggs

1 teaspoon apple cider vinegar

¼ cup coconut oil, melted

1 ½ cups shredded carrots


1.  Preheat oven to 350 degrees.  Combine almond flour, baking soda, salt, and cinnamon in a large bowl.  Combine wet ingredients (dates, bananas, eggs, vinegar and oil) in bowl of food process until smooth.  Transfer wet ingredients to the large bowl with the dry ingredients.  Stir until well combined.  Fold in carrots.


2.  Spoon batter into muffin tins lined with paper liners, filling about 3/4 full.  Bake about 25 minutes, or until toothpick inserted into the center comes out clean.  Cool on wire rack and store in air-tight container for up to 4 days.

Makes about 12 muffins


Brown Rice Salad with Roasted Butternut Squash & Goat Cheese November 12, 2012

thanksgiving side dish brunch recipe vegetarian squash grain salad vegetarian

 
In writing about Thanksgiving side dishes, it occurred to me that I should share one of my favorite grain salad recipes, which I have made for Thanksgivings past and regularly serve at any fall/winter brunch.  Here’s the story behind this holiday-worth salad.  Several years ago Bouchon Bakery had a fall salad that knocked my socks off.  It was a farro-based grain salad, with balsamic roasted butternut squash, toasted hazelnuts and creamy goat cheese. It had the perfect combo of textures (chewy, crunchy, creamy) and flavor (sweet and salty).  When they took the dreamy fall salad off the menu, I went in search of a similar recipe to recreate the dish at home. Luckily, one of my favorite food bloggers, Heidi Swanson over at 101 Cookbooks, came up with a similar recipe, trading the hazelnuts for walnuts (which are actually much easier to prepare – no skins to contend with).  I’ve adapted it a bit, and this grain salad has become an absolute staple in my repertoire.  I like to serve it with brunch or even as a side for Thanksgiving – particularly good for any vegetarians at the table because it’s so hearty.  Every time I serve  it to rave reviews (and secretly hope for leftovers for lunch).  This is one of those recipes that people always ask for.


I roast the squash and toast the nuts a few days in advance so the salad comes together quickly when I go to serve it.  The recipe has evolved over the years and I now serve it using brown rice instead of farro because it’s easier to find and gluten-free, but you can also use barley (pearled) in this salad with good results.  Don’t overcook the rice – its important for the grains to be intact.


Brown Rice Salad with Roasted Butternut Squash & Goat Cheese

2 cups brown rice
4 cups water (or stock)
3 cups butternut squash, cut into ½” pieces
1 large shallot cut into quarters
1 tablespoon fresh thyme, minced
3 tablespoons olive oil
1 tablespoon balsamic vinegar
1 cup walnuts, deeply toasted
3 tablespoons toasted walnut oil (or more olive oil)
¼ cup goat cheese, crumbled

1.  Preheat oven to 375.  Combine brown rice and water in large saucepan or rice cooker; cook according to package directions.  Cool slightly and set aside.

2.  While the rice is cooking, toss squash, shallot and thyme with the olive oil, balsamic vinegar and a couple big pinches of salt on a rimmed baking sheet lined with foil.  Arrange in a single layer and place in oven for about 20 minutes, tossing the squash and shallots every 5-7 minutes to get browning on multiple sides. Remove from oven, let cool slightly, and mince cooked shallots (reserve a few slices for garnishing, if you would like).

3.  In a large bowl gently toss everything other than the goat cheese (except the goat cheese) with toasted walnut oil (or olive oil).  Season to taste with salt and pepper.  Transfer to serving dish and top with crumbled goat cheese and reserved slices of shallot (if using).

Serves 8 as a side (4 as an entrée).


Pistachio & Strawberry Salad with Mint Vinaigrette May 17, 2011

Jazzing up a salad for spring entertaining is as easy as adding a few special ingredients, like toasted pistachio nuts and sliced strawberries.  The mint vinaigrette gives the salad a fresh taste, and the strawberries and nuts provide great contrast in texture and flavor.  I love to serve this salad as part of a brunch menu.  I usually make extra dressing so I have it for a quick weeknight meal.  Add roasted or grilled chicken to this salad and you have yourself a healthy lunch or dinner.

This salad travels well if the ingredients are kept separate and tossed together when ready to serve.

Pistachio & Strawberry Salad with Mint Vinaigrette

1/4 C. shelled pistachios, toasted

1/2 C. strawberries, sliced

5 oz mesclun salad or baby romaine salad mix

1/2 C. mint vinaigrette (recipe below)

Toss salad ingredients with dressing in a large salad bowl.  Serve immediately.

Mint Vinaigrette

1/2 cup extra virgin olive oil
1/2 cup mint leaves, tightly packed
1/4 cup white wine vinegar
1 Tbs. Dijon mustard
1 Tbs. Agave nectar (or honey)
1/8 tsp. kosher salt
fresh ground pepper, to taste

In a large food processor, blend the oil and mint until well combined.  Add the remaining ingredients and blend until fully combined.  Maked about 1 cup of dressing and can be stored for up to 3 days.


Asparagus with Hazelnut Dressing May 6, 2011

This is, hands down, my favorite asparagus recipe.  I love the tender stalks after they’ve been peeled and blanched, and the crunchy hazelnut dressing adds a nice contrast in texture.  Serve this dish as a side at brunch, lunch or dinner.  It’s great when served with roasted or grilled meat.  You can make the asparagus a few hours ahead, along with the vinaigrette – just store them separately until ready to serve.

Asparagus with Hazelnut Dressing

1 medium shallot, minced

2 Tbs. red wine vinegar

1 Tbs. Dijon mustard

½ tsp. agave nectar or honey

1/3 C. olive oil

½ C. skinned hazelnuts, toasted and chopped

2 pounds asparagus, trimmed and stalks peeled

1.            Fill a bowl with ice and cold water to make a water bath.  Bring a pot of salted water to a boil.  While waiting for water to boil, trim asparagus spears to where they snap when bent.  Place trimmed asparagus in boiling water for 1 minute, or until bright green and slightly tender.  Immediately plunge asparagus into water bath to stop cooking.  Once cooled, remove asparagus and refrigerate until ready to use.

2.            In a medium bowl, whisk together shallot, vinegar, mustard, agave and oil.  Stir in hazelnuts.  Drizzle dressing over asparagus.  Serve at room temperature.


Gluten-Free Blueberry Almond Muffins January 27, 2011

I always include a quick bread, coffee cake or muffins in any brunch menu.  These gluten-free muffins are tasty enough to serve to a crowd, and any gluten-free guests will be thrilled that they can indulge.  These muffins have great flavor but definitely taste whole grain (which I like!).  The texture is more dense than a standard blueberry muffin, but is still very moist and flavorful.

I like to use frozen wild blueberries, which are smaller and more nutritious than regular frozen blueberries (and very easy to find).   If you’d like, add some lemon zest to the batter – I’ve made them with that variation during the summer, but reduced the almond extract to 1/2 tsp. so the flavors didn’t compete.  If you don’t have almond extract it’s worth buying a small bottle.  It adds an amazingly deep almond flavor to baked goods.  However, you can substitute vanilla extract in this recipe: Just be sure to use gluten-free vanilla extract if you are making these for someone who can’t tolerate gluten.  These muffins freeze beautifully when wrapped individually in plastic wrap to seal in the moisture.

This recipe is inspired by a recipe that originally appeared in Vegetarian Times.

Gluten-Free Blueberry Almond Muffins

1 cup almond flour

1 cup brown rice flour (or gluten-free flour blend)

1 ½ tsp. baking powder

½ baking soda

½ salt

¾ cup sugar

6oz plain yogurt (fat free or low-fat)

½ cup olive oil or canola oil

2 eggs

1 tsp. almond extract

1 ½ cup frozen blueberries (preferably wild, still frozen)

2 Tbs. turbinado sugar, such as Sugar In The Raw

1.            Preheat oven to 350 degrees.  Line 12 cup muffin tin with paper liners.

2.            Whisk together almond flour through salt in a large bowl.  In a separate bowl, whisk together sugar through almond extract.  Fold yogurt mixture into flour mixture until just combined.  Fold in blueberries.

3.            Divide batter evenly between muffin tins.  Top with a sprinkling of sugar in the raw.  Bake in center of preheated oven for 18-22 minutes, until slightly golden brown and toothpick inserted into center of muffin comes out clean.  Cool for 5 minutes in tin, then move to wire rack to cool completely.

Makes 12 muffins


Mesclun Salad with Roasted Butternut Squash January 16, 2011

Winter salads can be boring.  My solution is to add a special ingredient, like roasted butternut squash.  Roasting brings out the sweetness of the vegetable and gives it a great texture.  Adding a good balsamic vinaigrette and candied walnuts or pecans (buy Pecan Pralines if you don’t feel like making them yourself) make this salad absolutely delicious.  Top it with some crumbled goat cheese for an extra special touch.  Serve this salad at brunch, lunch or dinner.

Mesclun Salad with Roasted Butternut Squash

½ medium butternut squash, peeled and diced in ½” pieces

1 large shallot, cut into quarters

2 Tbs. extra virgin olive oil

1 Tbs. balsamic vinegar

½ Tbs. fresh thyme, chopped

salt and pepper

5 ounces mesclun greens or other salad mix

¼ cup candied walnuts or pecan pralines, chopped

Balsamic vinaigrette (homemade or store-bought)

2 ounces goat cheese, crumbled (optional)

1.            Preheat oven to 375 degrees.  Toss squash with shallot, olive oil, vinegar, thyme, salt and pepper on a rimmed baking sheet until well coated.  Arrange in a single layer and roast in the preheated oven for about 20 minutes, tossing after 10 minutes, and cook until squash is soft and slightly browned.  Once cooked, chop shallot into small pieces and mix with squash.  Squash mixture can be prepared up to 2 days in advance.  Cool before adding to salad.

2.            Place mesclun greens in large serving bowl.  Top with roasted squash mixture, candied nuts and balsamic vinaigrette.  Toss until well combined.  Sprinkle with crumbled goat cheese, if you are using it.   Serve immediately.

Serves 6


Hip Tip – Celebrate Citrus Season January 3, 2011

It may not seem like there’s much in the way of seasonal produce this time of year, but now is the peak of citrus season. Enjoy navel, Cara Cara (red navel) and blood oranges. Serve them instead of fruit salad for brunch, peeling and slicing each orange into rounds and fanning them out on your serving platter. Use a variety for visual interest, and include sliced kiwis (also in season during the winter) for a tart contrasting flavor.


Whole Wheat Cranberry Orange Bread/ Muffins November 24, 2010

This recipe has all the flavors of the season and provides a nice, sweet treat for dessert or Thanksgiving brunch.  Keep a loaf or muffins on hand for guests to eat with coffee for breakfast.  This is also a great way to use up a package of leftover fresh cranberries.


I like to make both muffins and mini loaves at the same time so I can give the mini loaves as gifts or freeze them for later use.  You could halve the recipe if you’re cooking for a small crowd (it will make 12 muffins OR 4 mini loaves).


Whole Wheat Cranberry Orange Muffins

2 C whole wheat flour

2 C white flour (or whole wheat flour)

1 C sugar

3 tsp. baking powder

1 ½ tsp. salt

1 tsp. baking soda

3 tsp. grated orange zest (from 2 large oranges)

1 ½ C. orange juice (about 2 large oranges)

½ C. canola oil

2 large eggs, lightly beaten

½ C. agave nectar (if you do not have, substitute an add’l cup of sugar)

12oz cranberries (rinsed and picked over), chopped

1 C. orange flavored OR regular craisins

cooking spray

3 Tbs. sugar in the raw (optional)


1.            Preheat oven to 400 degrees.  Combine dry ingredients (flour through baking soda) in large bowl.

2.            In a medium bowl, combine rind, juice, oil, eggs and agave; whisk to mix well.  Add liquid mixture to flour mixture and stir until just moist.  Fold in chopped cranberries and craisins.

3.            Spray 24 muffin tins (or 12 muffin tins and 4 mini loaf pans) with cooking spray.  Spoon mixture into prepared pans, and sprinkle evenly with sugar in the raw, if using.  Bake in the center of preheated oven for approximately 18 minutes, or until golden brown and toothpick inserted into center comes out clean.  Cool slightly, run a knife around the edge of the pan to release the bread from the sides, and remove from pan.  Cool on wire rack or seal in plastic wrap to lock in moisture.

Makes 24 muffins OR 12 muffins and 4 mini loaves

Tips

  • If you would rather make these muffins 100% whole grain, substitute an additional 2 cups of whole wheat flour for the white flour.
  • Using agave nectar, a natural sweetener, you can reduce the total sugar in this recipe.  If you do not have agave nectar on hand, use an additional cup of sugar ( ½ cup agave nectar = 1 cup sugar).
  • Using a food processor makes quick work of chopping the cranberries.  Be sure to pick out the mushy berries before chopping (every package has a few).
  • Sprinkling the tops with sugar in the raw adds a beautiful crunchy texture to the cooked muffins.
  • You can adapt this recipe to make 2 large loaves.  Bake for 30 minutes, then reduce heat to 325 degrees and cook for an additional 10-15 minutes, until a toothpick inserted into the center comes out clean.
 

Chocolate-Dipped Coconut Macaroons April 19, 2010

Don’t save coconut macaroons for a once-a-year treat during Passover.  Coconut macaroons are a delicious gluten-free, dairy-free dessert that’s quick and portable.  These macaroons taste nothing like the bland, dry canned varieties available at the store.  A home-made version will make a convert of anyone who generally likes coconut, but doesn’t care for canned macaroons.

This recipe is a variation on a recipe from Cooks Illustrated.

Chocolate-Dipped Coconut Macaroons

14 oz sweetened coconut flakes

1 ½ C. granulated sugar

1/3 cup + 1 Tbs. egg whites (use pourable egg whites or about 3 large eggs)

½ tps. almond extract (you can substitute vanilla but almond really makes these special)

½ C. dark chocolate chips or chunks (or more as needed, for dipping bottoms)

1. Place oven racks in upper-middle and lower-middle of oven; preheat 325 degrees.  Line 2 cookie sheets with parchment paper or silpats (reusable nonstick mats).

2. Chop coconut in food processor for 1 minute.  Add sugar and process for an additional 20 seconds. Add egg whites and extract; process for 1 additional minute, until the mixture resembles a paste, like slushy snow.  Scrape down sides of work bowl with a rubber spatula and process again, until stiff but malleable paste forms, about 5 seconds longer.  If mixture is crumbly or dry, turn machine back on and add water by drops through feeder tube until mixture forms a paste.

3. Using a 1” spring-loaded scoop or 2 tablespoons, drop mounts of paste onto prepared cookies sheets, forming 12 mounts on each sheet (24 total), spacing the mounds about 1 ½ inches papart.

4. Bake macaroons for about 20-25 minutes or until slightly golden brown, switching cookie sheet positions midway through baking.  Be careful not to overbake the macaroons or they will become dry when stored.  Cool macaroons completely on cookies sheets (removing them when warm will cause them to break).  Regular macaroons (without chocolate dipping) can be store in an airtight container for 5 days.

5.  When macaroons are completely cool, carefully remove them from the sheets.  Melt chocolate in a bowl in the microwave, at 30 second intervals, stirring rigorously between each interval to melt the chocolate.  It will likely require 1 minute in the microwave total.  Once melted chocolate is shiny and smooth, carefully hold each macaroon by its top and dip the bottom into the chocolate.  Twist to cover the entire bottom of the macaroon and to get a bit of the chocolate up the sides.  Place dipped macaroon on waxed paper and allow chocolate to harden.  Chocolate-dipped macaroons can be store in an air-tight container for up to 2 days (after that the chocolate will look dry).


Make-ahead Spring Brunch April 2, 2010

Check out my April 2010 column on The Family Groove for a make-ahead spring brunch menu. 

http://www.thefamilygroove.com/apr10_EntertainingOnTheEasy.htm